Throughout the dungeon, there are a variety of different traps. Some of them are instant death, some of them merely an annoyance. For the traps specific to Golden Idols, see the Golden Idol page.
It should be noted that enemies killed by way of being thrown into harm's way don't count as your kills.
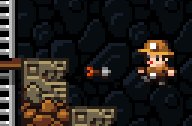
Arrow Trap
ARROWND
Exclusively found in Areas 1 and 4, the Arrow Trap will shoot arrows at anything that comes within six or seven tiles directly in front of them. The trap itself is a stone square with a face carved on it. All thrown objects, including arrows, pots, stones, damsels, and skulls will set off arrow traps. Enemies that come in front of one will also trigger the trap, which will usually kill them. Arrows shot from the Arrow Trap do 2 damage. Note that as of version .99_5, Arrow Traps serve as light sources.
In the unfortunate occasion that you come across an Arrow Trap without any thrown objects on hand there is a work-around method for baiting the trap with your bombs and ropes. This method can also save you the hassle of backtracking to find a stone to trigger the Arrow trap as well.
Spikes
Unfortunately, while this would have been a safe drop in previous versions, this is no longer the case.
Spikes can be found throughout the dungeon. They are perfectly safe to walk through, but will instantly kill you if you jump or fall on them. They will also instantly kill enemies that land on them. In previous versions, dropping from one tile above spikes, or flipping down and then dropping into spikes would allow you to land on them safely. However, in the current version (v1.1) the only way to safely drop down on to spikes is via use of a rope or the cape (or a flip-hang directly into the spikes). Whether or not spikes kill you may depend on your vertical speed and the speed limit for enemies is far more strict. For example you can drop a damsel safely while on spikes but tossing her or being dropped from one level up will kill her.
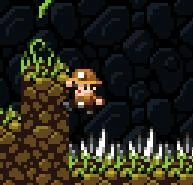
A common and deadly feature of Area 2 are the Spike pits, which are inhabited by monkeys and have an overgrowth of vines. You must jump your way across the vines, all the while, avoiding the wrath of several Monkeys who are hellbent on relieving you of your inventory or worse, stunning you above the pit of spikes, causing you to fall to your death.
It is important to note that while the spikes themselves are not treated as a destructible objects in the environment (eg: rock walls, grey blocks), if you destroy the floor that they rest on (whether using bombs or a mattock), the spikes will usually disappear.
Spider Web
Found in Area 1 and only rarely afterwards, spider webs will prevent you from jumping should you get caught in one. Mashing the jump button will cause the web to rapidly degrade and eventually fall apart. You can also simply walk out of a web either way. Spider webs are randomly generated, and are also guaranteed to be underneath Giant Spiders. Giant Spiders and the Webcannon can also shoot webs. Webs cannot damage you, but can trap you in a position where bats and spiders can easily hit you multiple times. Bomb-displaced Golden Idols and perhaps other items may become caught in spider webs, complicating their retrieval. (Beneficial side effects include being able to suspend arrows and bombs in mid-air, allowing you potential protection from arrow traps and a poor man's alternative to a sticky bomb.)
Many types of enemies can get trapped in spider webs, allowing you to deal with or avoid them easily. Spiders (and their giant cousins), however, are immune to webs. Shopkeepers caught in webs can still turn around and shoot you.
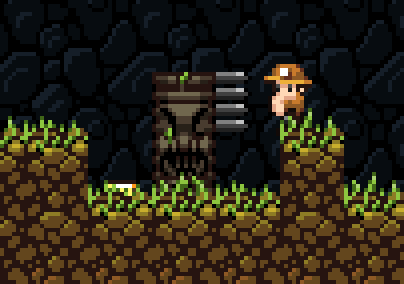
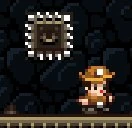
Spear Trap
The spears trigger if you (or enemies, or thrown objects) get too close.
Spear Traps (or Totem Poles or Spiked Totems) appear in Areas 2 and 4. They are two tiles tall and one wide, and have four sets of spears that extend slightly less than one tile horizontally. The spears do 12 damage and will thus usually instantly kill you should you touch them. The only safe place on a totem pole is on top of it. With some degree of luck and skill you should be able to climb a totem pole before the spears shoot out, but it is a far safer option to use a bomb or armed Fire Frog to blow it up or a rope to get on top of it. For those of you daring enough to practice a method of getting up these obstacles without using your limited resources, follow these guidelines:
- Try to quickly hop onto and ascend the Totem before it starts its spear releasing cycle. If you are swift enough you'll beat the narrow timing. Note that the Totem will begin to detect you if you approach within 3 tiles of it.
- If you have alerted the Totem already, then the name of the game is timing. Standing with a gap of 1 tile separating you and the totem, hop onto it immediately after the top spears have begun to retract. Exposed spears that are retracting do no damage. Climb and take a breather if you make it out alive.
It is of passing importance to note that against Area 2 enemies, the Totem's spears will deal 2 damage, allowing you to dispatch of any injured Man-eating plants or Cavemen that might run into them with a single whip. As of version .99_5, Spear Traps serve as light sources.
Springboard
Springboard in use.
Springboards appear only in Area 3. They are randomly placed on the ground and can be seen as a raised bump. Stepping on a springboard will launch you into the air, roughly 5 to 6 tiles high. Normally, this wouldn't matter too much, except in Area 3 it does for several reasons, the first being: All of the levels in Area 3 are bottomless, meaning you will instantly die if you fall into the pit. Secondly, springboards tend to be generated on ledges, and unexpectedly being launched into the air is likely to cause Fall Damage unless you have a Parachute, Cape, or Jetpack to slow your descent. However, falling onto a springboard from a great height will negate any fall damage you would have received otherwise.
Yeti can also be launched by springboards, which can be both unexpected and deadly.
Bottomless Pit
The entirety of Area 3 is bottomless, and will instantly kill you if you fall. Additionally, in v.99, dying during a Rushing Water level sometimes resulted in Area 1 maps being generated with a bottomless chasm instead of a solid dungeon floor. This has since been fixed.
Falling Platform
The thin platforms in Area 3 can only hold your weight for about a second before plummeting, possibly dropping you all the way to the bottom of the level and into the pit. Note that a falling platform can support your weight indefinitely if you hang off its edge rather than stand on it, and that no matter how far the platform falls you won't suffer any falling damage so long as you ride it all the way to its destination. As of version 0.99.8, these platforms kill enemies and destroy spike traps underneath them as they fall. Also note that a platform that falls onto a platform below it will result in both platforms being smashed.
Ice Bridge
The "wet fur" level feeling in Area 3 contains bridges made of thin ice. These will gradually melt away while you stand on them, often dropping you onto spikes that lie below, and the Giant Yeti's roar damages bridges as well. Enemies may stand on the ice without causing it to melt. As of 0.99.8, these are also used as part of Area 3's Golden Idol trap, rather than falling platforms.
Smash Trap
Thwomp!
Smash traps, patterned after the Thwomps of Super Mario Bros. fame, appear in Area 4. If you come within range of one, it'll slide in your direction, stopping only when it hits a solid obstruction like a wall. Touching a smash trap is worth 10 damage for very brief touches or instant death in some cases, much like a boulder. It's possible to briefly stand on top of one with no damage taken, though, provided it's not moving upward.
Unlike most traps, which can be triggered by enemies and thrown objects, smash traps are only triggered by the presence of your character.
As of version 0.99.8, smash traps provide light during the "I can't see a thing!" level feeling, making them much easier to avoid in the dark.
Interestingly, Smash traps will, befitting of their name, smash through falling platforms. As these two objects appear in different areas, this is a custom level exclusive feature.
Sadly, smash traps do not do damage to the Mummy.
Lava
Behaving much like the water in Area 2, but much deadlier, lava is capable of killing the Spelunker and all enemies on contact. If a lava pit is too wide to jump across easily, try knocking out the side of the pit with bombs to reduce the lava's level. Ropes suspended over lava will burn from the bottom up.
Objects dropped into the lava will sink slowly. If you accidentally drop an item into the lava, it may be possible to retrieve it provided you're fast enough and you dropped it close enough to the edge of the pit. However, destroying the wall supporting the lava, attempting to drain the lava, may result in the item sinking to simply float in mid air, unretrievable (unless hit with a well timed bomb to send it flying). Blocks dropped into lava can provide a temporary stepping stone.
Lava periodically produces magma men. It also produces light during the "I can't see a thing!" level feeling.
Chest and Pot Traps
Occasionally chests and pots contain nasty surprises instead of treasure. Sometimes a chest will open to reveal a bomb which is already in its "flashing quickly" stage of detonation, giving the Spelunker about one second to escape from the blast radius; although these are rare, it's wise not to open a chest unless you're prepared to make a run for it. Meanwhile, pots sometimes contain snakes or spiders, which pop out when the pot is broken. The safest way to deal with these is to smash pots with the whip while standing as far away from them as possible; this will kill anything lurking inside without putting the Spelunker in danger.